
You’ve got a printout or a phone screen open, trying to figure out where the red rock canyon scenic drive map actually takes you before you commit a half day of your Las Vegas trip to it. Good instinct. This loop packs in sandstone cliffs, desert wildlife, and some of the best photo stops near the city, but only if you know where the pullouts and trailheads sit along the route.
Here’s the short answer: the drive is a one-way, 13-mile loop off West Charleston Boulevard, with about a dozen marked overlooks and trailhead turnoffs spaced along the way, each worth a stop for a different reason. Some are quick photo pulls, others lead to short hikes with canyon views that the road itself doesn’t show you.
Below, we’ll walk through the full route in order, point out which scenic overlooks and trailheads deserve your time, and flag the ones you can skip if you’re short on hours. We’ll also cover entrance fees, timing, and how the drive connects to nearby stops like Hoover Dam, so you can plan a visit that fits your schedule instead of guessing your way through it.
Why the scenic drive map matters for your visit
Most visitors treat Red Rock Canyon like a drive-through safari, cruising the loop with the windows down and stopping wherever looks good in the moment. That approach burns time you don’t have. The 13-mile loop is one-way with limited turnaround points, so if you blow past the Calico Hills pullout without knowing it’s coming, you can’t just circle back. A map tells you exactly where each overlook sits relative to the entrance, so you’re not making split-second decisions at 25 mph while a line of cars stacks up behind you.
Knowing the order of stops before you drive turns a scenic loop into a planned visit instead of a guessing game.
Timing matters just as much as sequence. The scenic drive has a timed entry system during peak season, and the visitor center, overlooks, and trailheads each demand a different amount of time. If you want to hike Calico Tanks or Ice Box Canyon, you need to budget an extra hour or two beyond the drive itself. Without a map showing which stops have trailheads attached, you’ll either skip hikes you actually wanted to do or run out of daylight trying to fit them in after the fact. Groups visiting Las Vegas on a tight schedule, especially those pairing this stop with Hoover Dam or the Strip the same day, need to know upfront which overlooks are five-minute photo stops and which ones eat up ninety minutes.
Avoiding the common planning mistakes
A surprising number of visitors show up expecting a quick drive-by experience similar to a highway scenic byway, then get caught off guard by how spread out the route actually is. Here’s what the map helps you sidestep:
- Missing the one-way restriction: There’s no shortcut back to an overlook you skipped. You commit to the loop direction from the start.
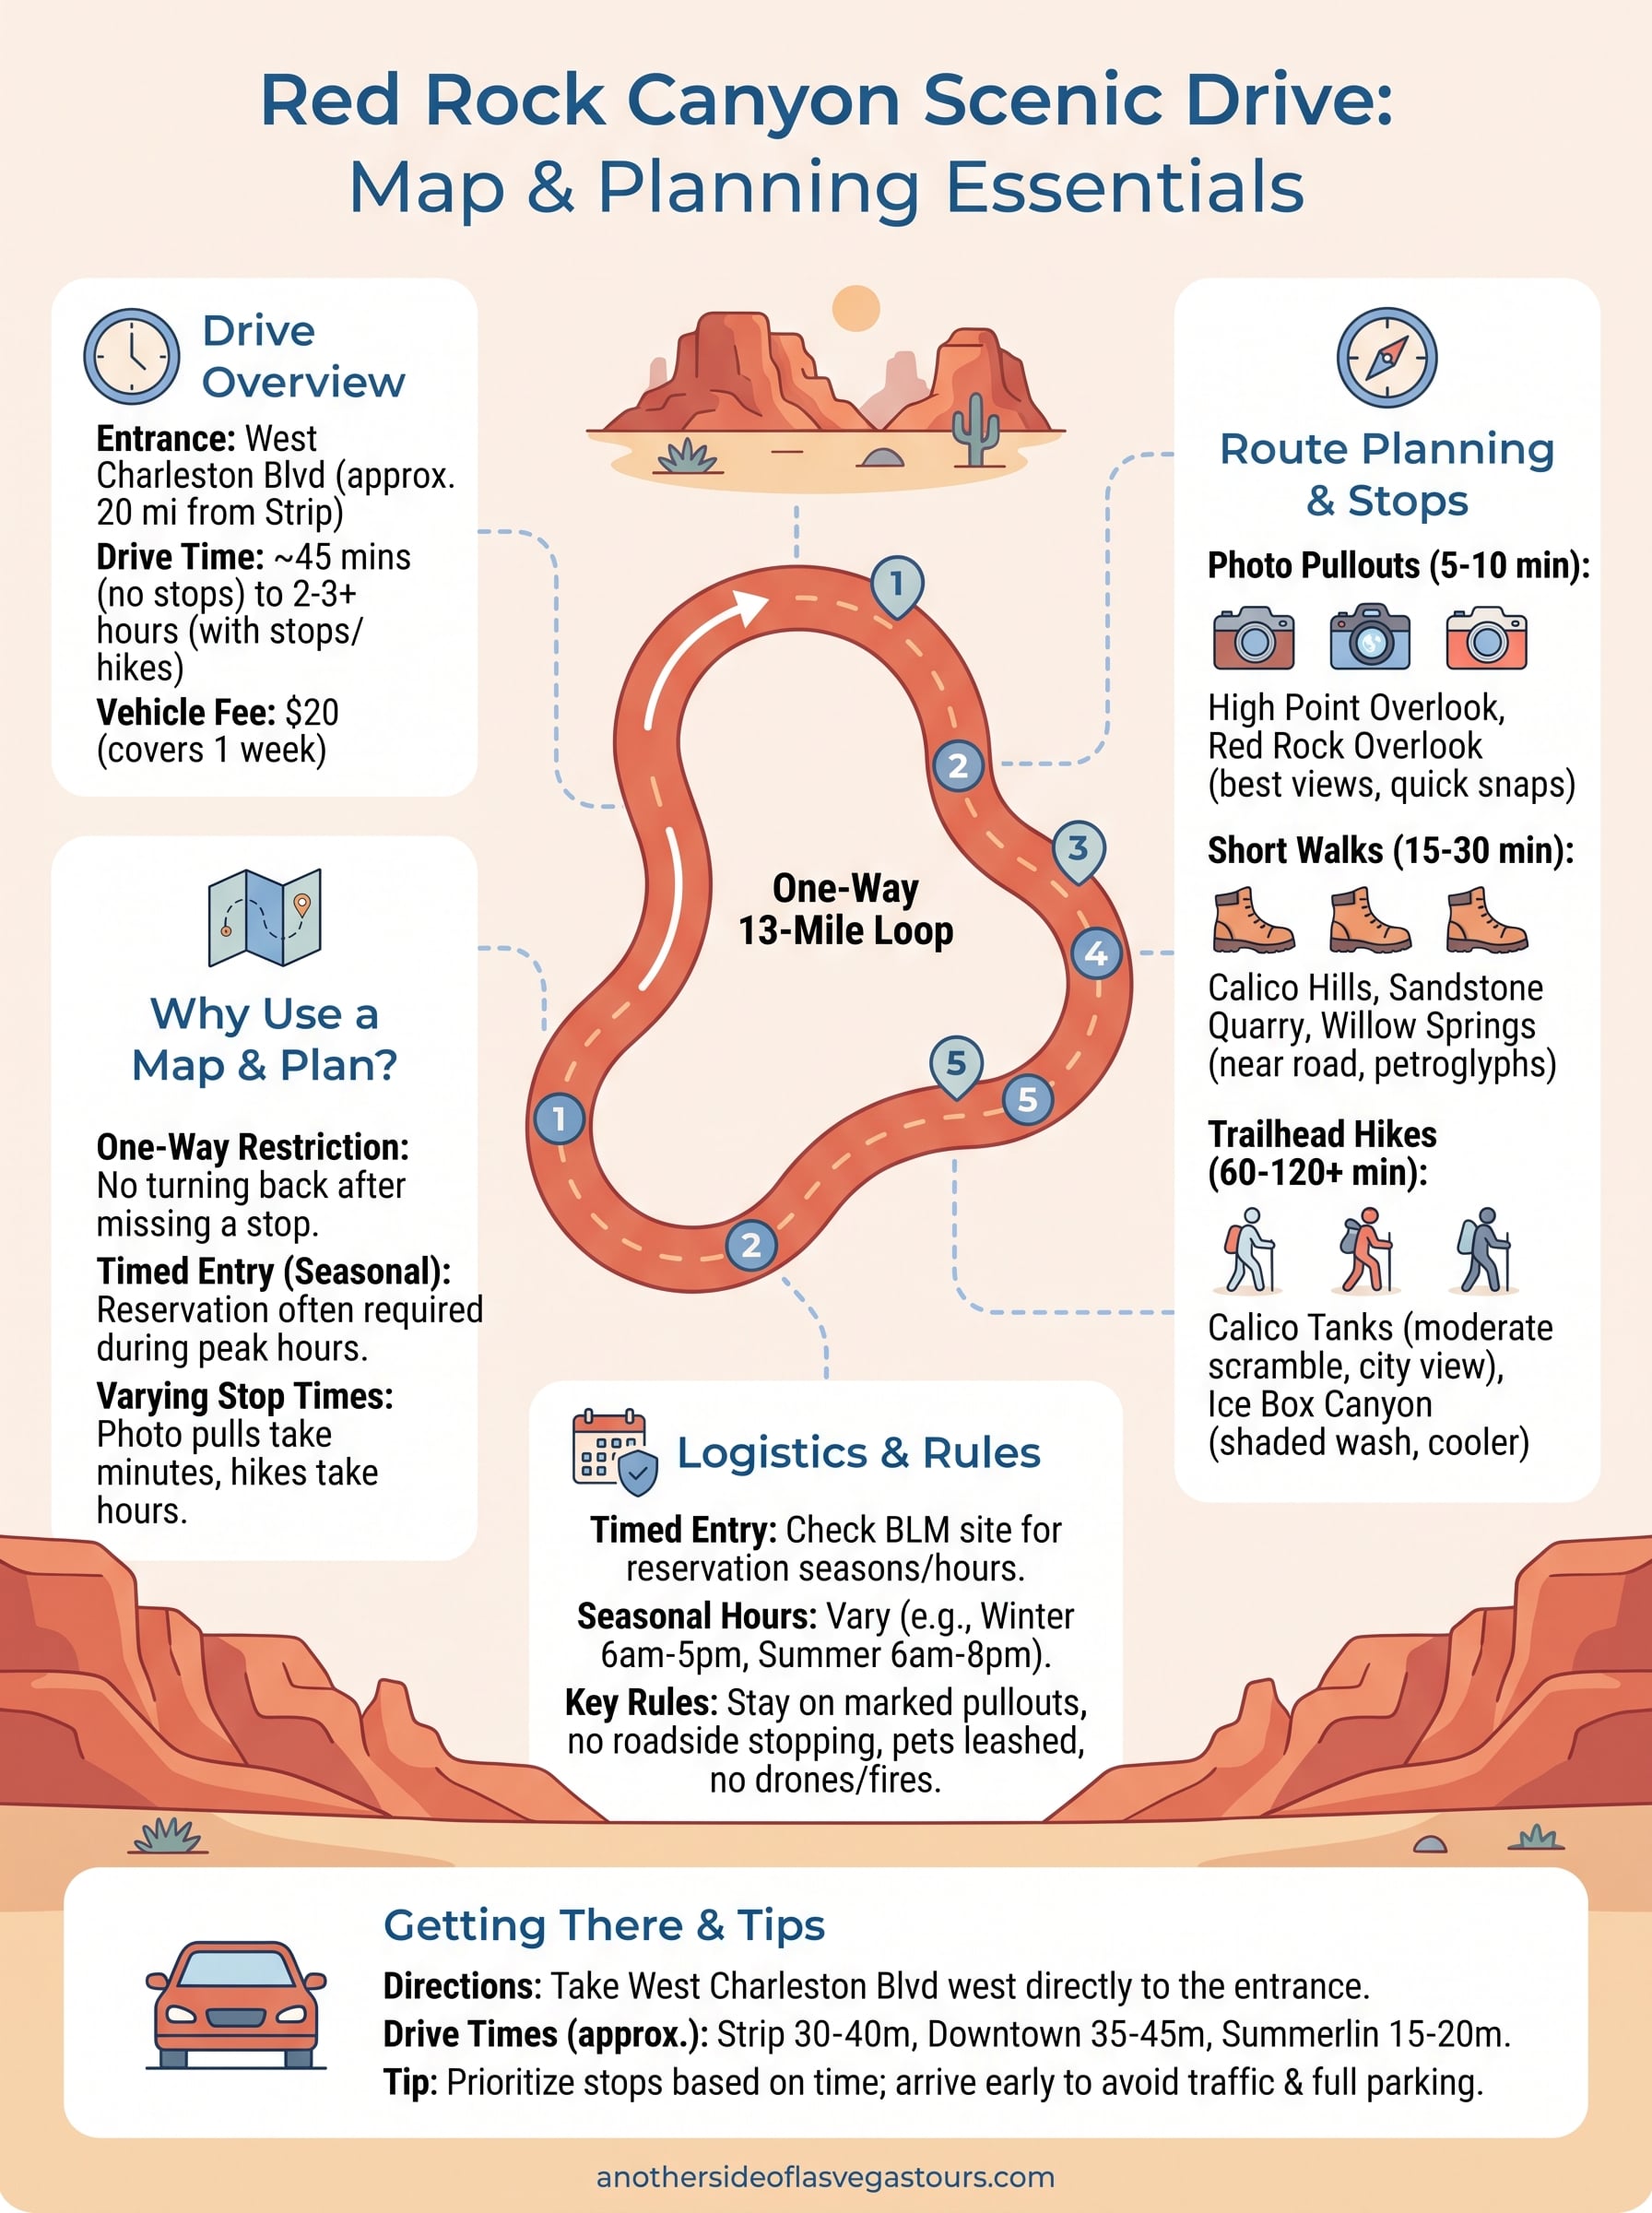
- Underestimating drive time: The loop itself takes about 45 minutes without stopping, but most visits run two to three hours once you factor in overlooks and a short hike.
- Skipping the visitor center: It sits near the entrance, before the main loop begins, and it’s easy to miss if you’re focused only on the overlooks ahead.
- Not knowing which stops require walking: Some pullouts are roadside views. Others require a five to fifteen minute walk to reach the actual vista.
Specialized guides make a real difference here, because they’ve driven this loop enough times to know which overlooks get crowded by midday and which trailheads are worth the detour based on the season. On our Red Rock Canyon tours, we build the stops around that kind of insider timing rather than a generic checklist, which is exactly the value a printed map can’t give you on its own.
What a good map actually shows you
A useful map for this drive does more than trace the loop shape. It should mark mile markers for each overlook, note which stops connect to trailheads, and flag the one or two spots with restrooms or water. The National Park Service style layout used by the Bureau of Land Management for Red Rock Canyon covers this well, and cross-referencing it against real drive times helps you build a realistic itinerary instead of an optimistic one.
Finally, the map matters because Red Rock Canyon isn’t a single attraction, it’s a collection of distinct landscapes strung along one road. Sandstone cliffs at Calico Hills look nothing like the desert wash at Pine Creek Canyon, and the high point at Red Rock Overlook offers a totally different vantage than the valley views near the Ice Box Canyon turnoff. Understanding the layout ahead of time helps you prioritize based on what you actually want to see, rather than stopping at whatever’s first and running low on time before you reach the stops that matter most to you.
How to use the map to plan your route
Start by grabbing the official map from the Bureau of Land Management before you leave your hotel, either as a PDF or a photo saved to your phone since cell service drops in spots along the loop. Once you have it open, trace the one-way loop road from the entrance station to the exit back onto West Charleston Boulevard, and count the numbered pullouts. Most maps label thirteen stops in sequence, and matching that numbering to your own priorities before you drive beats trying to read tiny text while merging into loop traffic.
A map you’ve studied ahead of time works. A map you’re reading for the first time at 25 mph doesn’t.
Next, sort the stops into three categories based on what you actually want out of the visit: quick photo pulls, moderate walks under fifteen minutes, and full trailheads that need an hour or more. High Point Overlook and the Red Rock Overlook fall into the first group, since you can pull in, snap a few shots of the sandstone formations, and get back on the road in five minutes. Calico Basin and Ice Box Canyon fall into the third group, where the trailhead access adds real time to your stop. Writing this breakdown next to each numbered stop on your map turns a vague plan into a checklist you can actually follow.
Building a realistic timeline
After sorting your stops, assign rough time blocks to each one so you’re not guessing halfway through the drive. A simple table works better than trying to remember everything:
| Stop type | Example stops | Time to budget |
|---|---|---|
| Photo pullout | High Point, Red Rock Overlook | 5-10 minutes |
| Short walk | Calico Hills, Sandstone Quarry | 15-30 minutes |
| Trailhead hike | Calico Tanks, Ice Box Canyon | 60-120 minutes |
Adding up these blocks against your actual time budget for the day tells you honestly whether you can fit two hikes or just one, and it keeps you from arriving at the visitor center already behind schedule.
Finally, mark your entry time window if you’re visiting during the timed entry season, since that reservation locks your arrival to a specific slot rather than letting you show up whenever traffic clears on the Strip. Cross-reference that window against your timeline so the drive itself, not the wait to get in, becomes the limiting factor on how much of the loop you actually see.
Key stops and overlooks along the scenic drive
Once you’re through the entrance station, the loop unfolds in a fixed order, and each stop earns its spot on the map for a different reason. Calico Hills comes first, roughly a mile and a half in, and it’s the one most photos of Red Rock Canyon actually show: red and orange sandstone domes rising right off the roadside, with a pullout large enough that you’re not fighting for parking even midday. High Point Overlook sits a few minutes further and does exactly what its name promises, giving you the widest single view of the valley floor and the Las Vegas skyline in the distance on a clear day.

The stops closest to the entrance get the most traffic, so the quieter overlooks further along the loop often reward you with a better view and fewer people.
Sandstone Quarry marks the next major stop, and it’s worth slowing down for even if you don’t plan to walk the short trail, since old quarry cuts in the rock face show exactly how this stone was pulled out for building material a century ago. Past that, Ice Box Canyon and Pine Creek Canyon sit close together, both offering a cooler, shaded contrast to the open desert you’ve been driving through, with Pine Creek in particular showing off the ruins of an old homestead if you know where to look along the wash.
The stops that get overlooked
A few pullouts don’t make it onto the highlight reel of most trip reports, but they’re worth building into your plan:
- Willow Springs: A quieter picnic area with petroglyph access nearby, easy to miss if you’re only watching for the bigger-name stops.
- Red Rock Overlook: Positioned late in the loop, this one catches the canyon in different light than the earlier stops, especially in late afternoon.
- Oak Creek Canyon: The final major turnoff before the exit, often skipped because visitors assume the drive is winding down by this point.
Saving a little energy for these last few stops pays off, since the crowds thin out considerably in the loop’s second half. That’s also where the overlooks and trailheads stop feeling like a checklist and start feeling like the reason you drove the loop in the first place, especially once you compare the desert wash views at Pine Creek against the open valley panorama back at High Point.
Trailheads and hikes accessible from each stop
Every major pullout on the loop connects to something you can walk, but the distance and effort swing wildly from a five-minute stroll to a half-day scramble. Calico Hills leads to two trails, both starting right off the same parking area: a short scramble up the sandstone slabs for views back toward the valley, and a longer connector that ties into the Calico Tanks trailhead a bit further down the road. Knowing which trailhead access point matches which trail keeps you from parking at the wrong pullout and adding an extra half-mile walk just to reach your actual starting point.
The hike matters more than the drive, so budget your time around the trailheads first and let the driving fill in around them.
Matching hikes to your energy level
Sorting the trails by difficulty before you leave the visitor center saves you from committing to something too long or too short for your group:
| Trailhead | Hike | Distance | Difficulty |
|---|---|---|---|
| Calico Hills | Calico Tanks | 2.5 miles round trip | Moderate, some scrambling |
| Sandstone Quarry | Grand Circle Loop | 2 miles round trip | Easy |
| Ice Box Canyon | Ice Box Canyon Trail | 2.6 miles round trip | Moderate, rocky wash |
| Pine Creek Canyon | Pine Creek Trail | 3 miles round trip | Moderate, exposed sections |
Calico Tanks rewards you with a natural water pool tucked into the rock and a panoramic view of the Las Vegas skyline at the top, which makes the scrambling worth it if you’ve got the time and decent shoes. Ice Box Canyon runs through a narrow, shaded wash that stays noticeably cooler than the open desert, a real advantage if you’re hiking between May and September.
Short walks worth the ten minutes
Not every stop demands a full hike, and a few short walks give you a payoff disproportionate to the effort:
- Willow Springs petroglyph loop: A flat quarter-mile walk to Native American rock art panels, easy for kids or anyone short on time.
- Sandstone Quarry short loop: A ten-minute walk past old quarry cuts, skippable if you’re already doing the full Grand Circle loop.
- Pine Creek homestead ruins: A brief detour off the main trail that most drive-through visitors never find.
Grouping these shorter walks with a longer hike at a nearby stop lets you cover more ground without adding a second full stop to your day.
Reservations, hours, and rules to know before you go
Before you build a perfect timeline, check whether the timed entry system is active for your visit dates. The Bureau of Land Management runs a reservation requirement for the Scenic Drive during the busier months of the year, typically covering daytime hours when traffic backs up at the entrance station. You book that slot online in advance, and it locks your arrival window to roughly an hour, so showing up outside your reserved time can mean getting turned away or waiting for the next opening. Confirm the current dates and hours on the official BLM Red Rock Canyon page since the exact season shifts slightly year to year.
A reservation you forgot to check locks you out just as effectively as a road closure.
Outside the reservation window, the drive still runs on set hours that change with the season. Winter closing times land earlier, while summer keeps the gate open later to account for longer daylight. Here’s a quick reference for what to expect:
| Season | Typical hours | Entrance fee |
|---|---|---|
| Winter (Nov-Feb) | 6 am to 5 pm | $20 per vehicle |
| Spring/Fall | 6 am to 7 pm | $20 per vehicle |
| Summer (Jun-Aug) | 6 am to 8 pm | $20 per vehicle |
The fee covers a week’s access and applies per vehicle rather than per person, so a full car splits the cost nicely if you’re traveling with a group.
Rules that trip up first-time visitors
A handful of rules aren’t obvious from the map alone, and missing them can cost you time or a ticket:
- No stopping outside marked pullouts. Rangers actively enforce this since the road has no shoulder in most sections.
- Drones require a separate permit. Casual flying over the overlooks isn’t allowed without one.
- Pets must stay leashed on trails and at overlooks, no exceptions for quick photo stops.
- Fires and fireworks are banned year-round given how dry the terrain stays.
Knowing these rules ahead of your drive matters as much as knowing the stops themselves, since a single mistake, like stopping on the shoulder for a photo, can turn into a delay that eats into the time you’d rather spend on the trail.
Getting to the Red Rock Canyon entrance
Getting to the entrance is straightforward once you know which road to take, but plenty of visitors waste twenty minutes circling Summerlin because their GPS routes them through surface streets instead of the direct highway path. The entrance sits on West Charleston Boulevard, about 20 miles west of the Las Vegas Strip, and the fastest route runs along Charleston straight from downtown or the resort corridor without needing to touch I-215 at all. Typing "Red Rock Canyon Visitor Center" into your phone’s maps app gets you there reliably, since the conservation area entrance is the default destination most navigation apps recognize.
Drive times from popular starting points
Budgeting your travel time matters as much as budgeting time for the loop itself, especially if you’re working around a timed entry reservation. Here’s what to expect from common starting points around the valley:
| Starting point | Distance | Drive time |
|---|---|---|
| Las Vegas Strip | 20 miles | 30-40 minutes |
| Downtown Las Vegas | 22 miles | 35-45 minutes |
| Summerlin | 8 miles | 15-20 minutes |
| Henderson | 28 miles | 45-55 minutes |
Traffic on Charleston Boulevard backs up during the morning commute, so leaving before 8 am or after 9:30 am usually saves you a chunk of that estimated time.
Arriving without a plan for parking wastes more time than the drive itself.
Parking fills up fast at the visitor center lot once the day gets rolling, particularly on weekends when locals join tourists for the loop. If the main lot looks full, don’t panic, there’s overflow parking a short walk from the entrance station, and the scenic drive itself has enough pullout space that you’re not stuck circling. Rideshare drop-off works too, though pickup can run slow if you’re trying to leave right as the gate closes for the evening.
Coordinating this drive with other stops on your Las Vegas itinerary takes some math, since Red Rock Canyon sits in the opposite direction from Hoover Dam. Visitors trying to fit both into one day often underestimate the backtracking involved, which is exactly the kind of logistics a guided option handles for you. Our Red Rock Canyon tours handle the driving, parking, and timing so you’re focused on the views instead of the map, and that’s worth considering if your schedule is already tight.
Making the most of your drive through Red Rock Canyon
A map turns this loop from a guessing game into a plan you actually control. Once you know where the thirteen numbered stops sit, which ones lead to real trailheads, and how the timed entry system affects your arrival, the whole visit gets easier to fit into a busy Las Vegas itinerary. Print the route, mark your priorities, and budget your hours honestly rather than hoping you’ll figure it out at the entrance station.
Still, even the best red rock canyon scenic drive map can’t handle parking, timing your reservation, or spotting the trail that most drive-through visitors miss. If you’d rather skip the logistics and let someone else drive while you take in the sandstone cliffs, book one of our private tours and let a local guide show you the stops worth your time.