
Hoover Dam sits just 30 miles southeast of the Las Vegas Strip, and it’s one of the most visited landmarks in the American Southwest. But showing up without a plan can mean long lines, sold-out tours, and missed highlights. This Hoover Dam visitor guide covers everything you need, hours, tour options, ticket prices, and driving directions from Vegas, so you can spend less time figuring out logistics and more time actually enjoying the dam.
We’ve been running guided tours from Las Vegas to Hoover Dam at Another Side Tours since 2007, and our guides have made this drive thousands of times. That experience has taught us exactly what visitors need to know before they go: which tour tier is worth the money, what time of year to avoid the crowds, and what to wear and bring so you’re comfortable the entire visit.
Below, you’ll find a complete breakdown of current hours of operation, tour types, pricing, and practical tips based on years of firsthand experience. Whether you’re planning a self-guided visit or considering a professionally guided tour from the Strip, this guide will help you make the most of your trip.
Hoover Dam basics and what’s open
Hoover Dam sits on the Colorado River at the Nevada-Arizona border, roughly 30 miles southeast of the Las Vegas Strip via US-93. The site is managed by the Bureau of Reclamation, not the National Park Service, so the rules, ticketing structure, and facilities differ from what you might expect at a typical federal landmark. Before diving deeper into this hoover dam visitor guide, it helps to know exactly what’s on-site, what’s included in your admission, and what hours you’re actually working with.
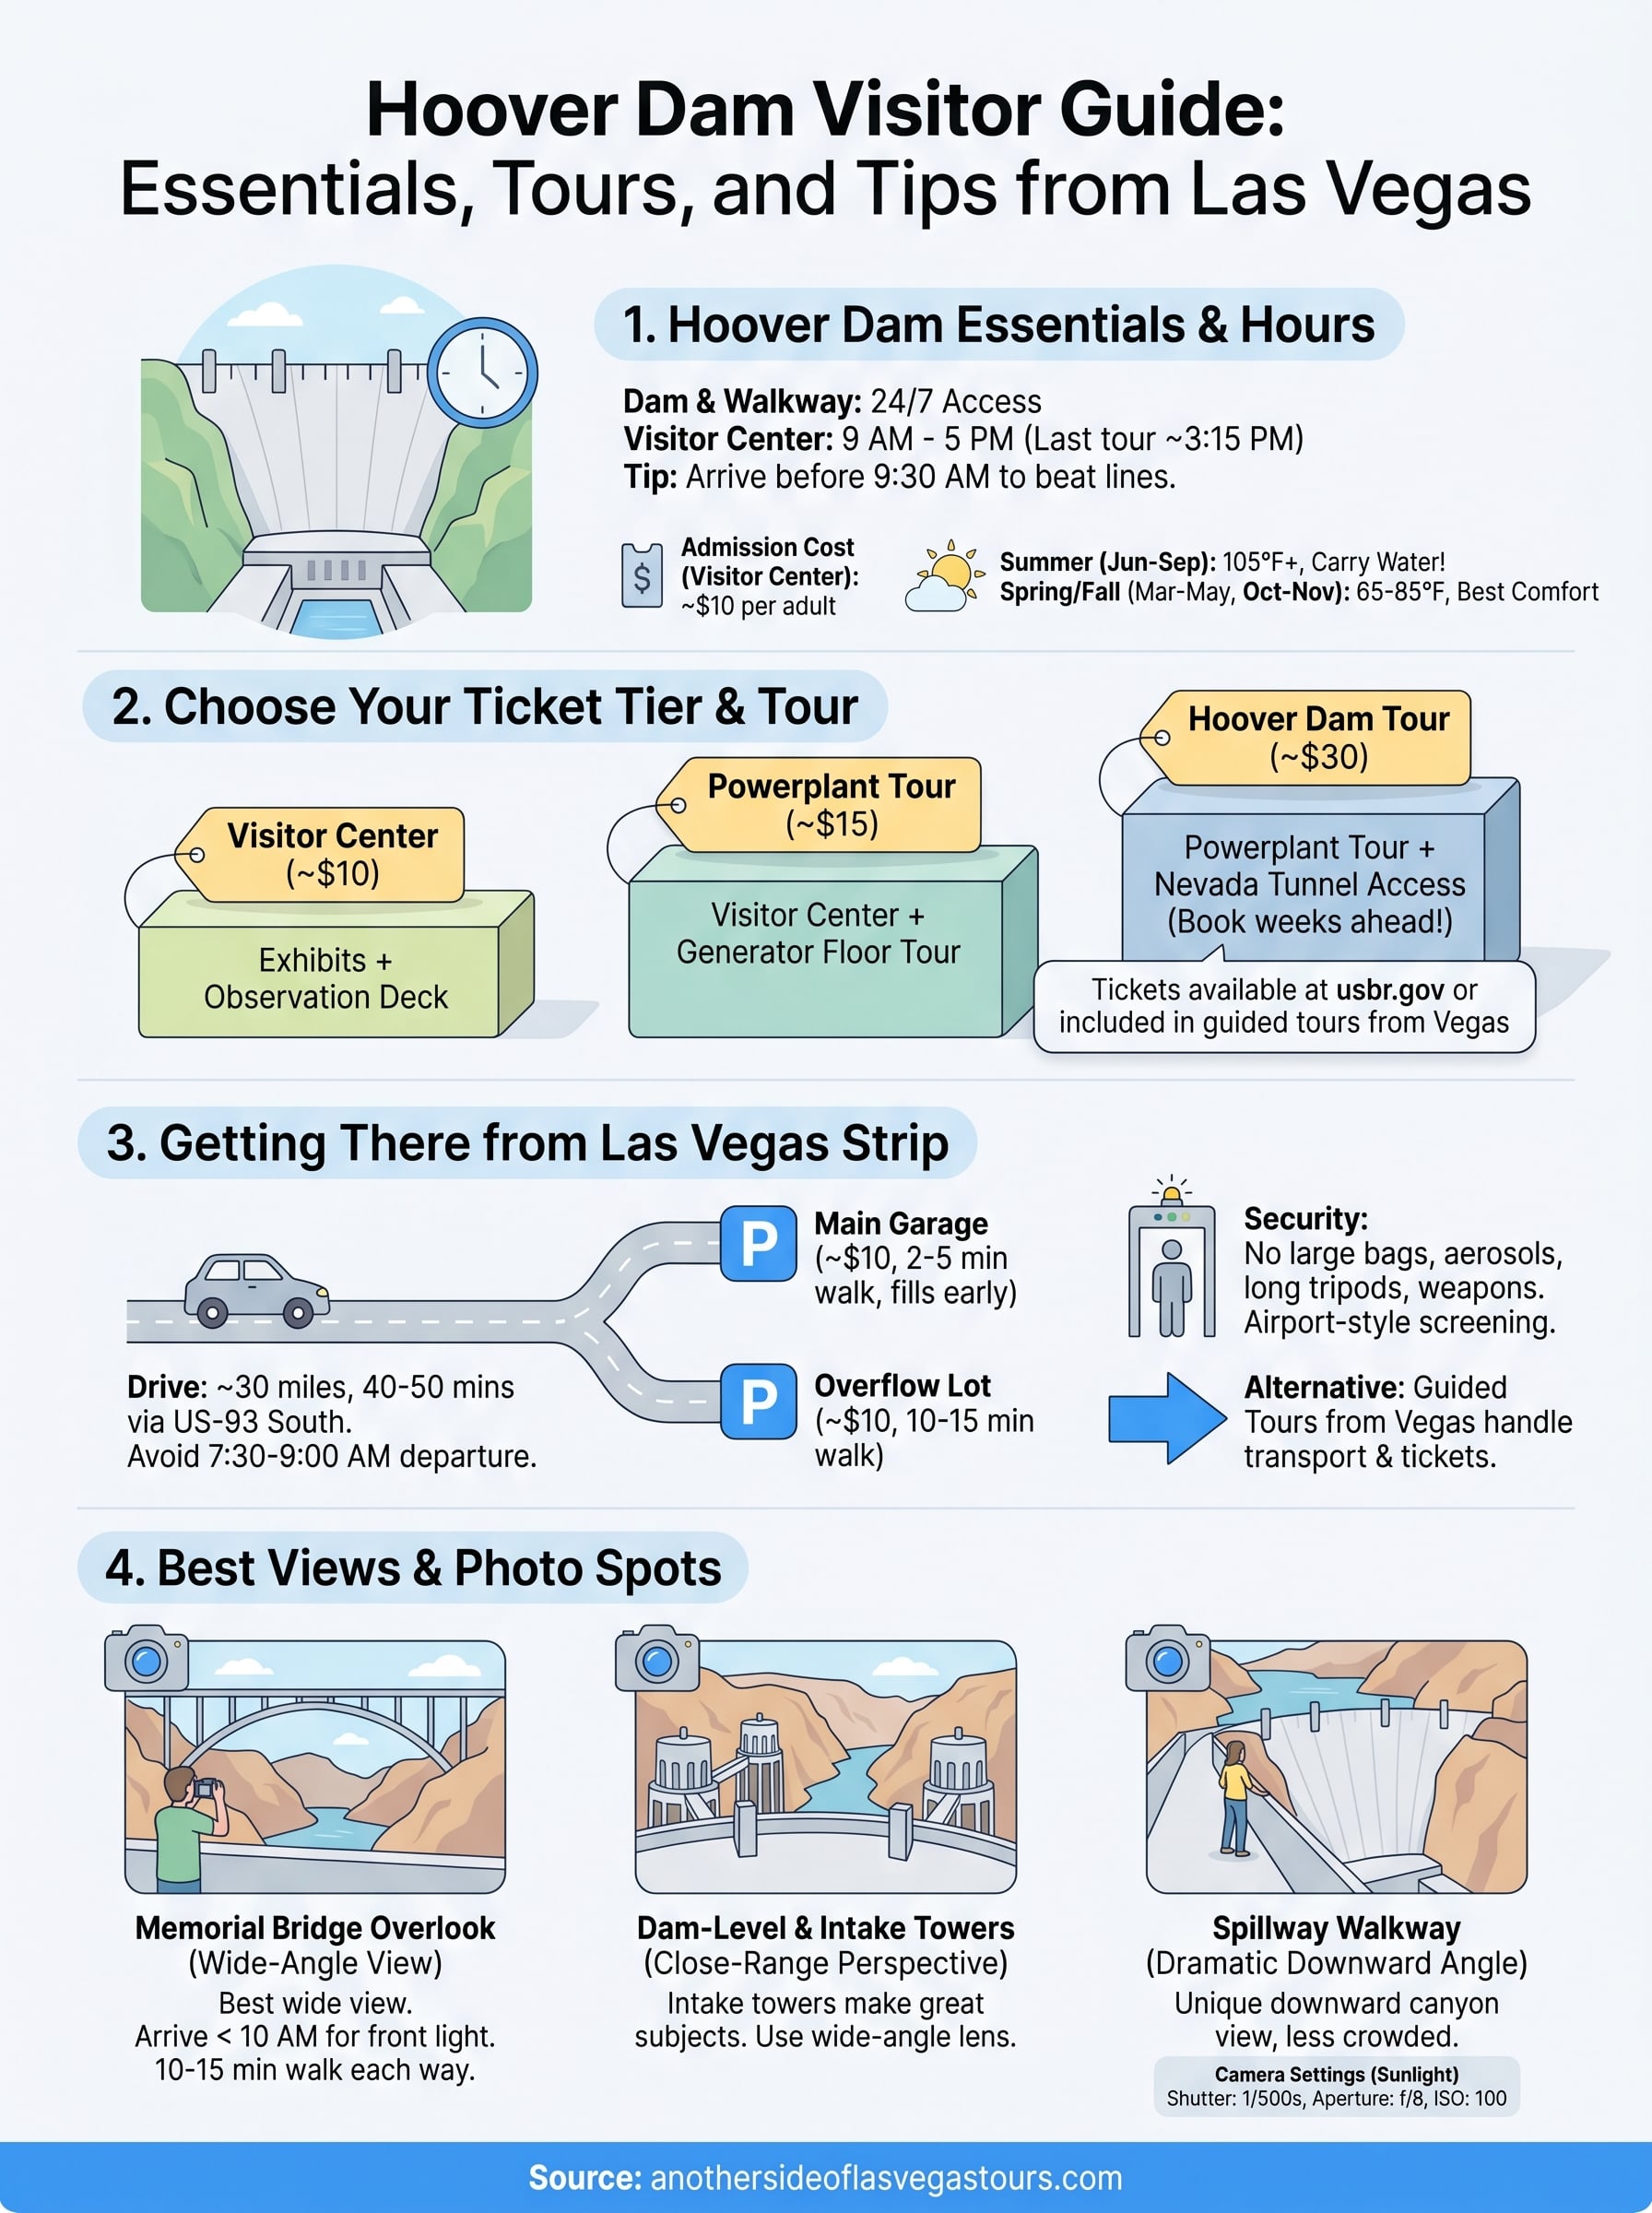
Site hours and admission costs
The roadway and pedestrian walkway on top of the dam are accessible 24 hours a day, 7 days a week. The Visitor Center, however, runs on a tighter schedule: it opens at 9 AM and closes at 5 PM daily, with the last tour entries accepted around 3:15 to 3:30 PM. Hours can shift on federal holidays, so confirming current times directly with the Bureau of Reclamation before your visit is a reliable step.
Arriving before 9:30 AM on a weekday nearly always means shorter lines at the ticket counter and faster access to the Visitor Center exhibits.
Admission to the Visitor Center costs approximately $10 per adult, which covers the exhibit floors and the rooftop observation deck. Children under 4 enter free, and discounts apply for active military and seniors. Power plant tours and the tunnel tour carry separate, higher ticket prices and sell out on busy days, so booking those in advance is not optional during peak months.
What’s inside the Visitor Center
The Visitor Center spans two floors of exhibits and multimedia presentations focused on the dam’s construction during the 1930s. You’ll learn about the roughly 21,000 workers who built the structure, the engineering decisions that shaped the design, and how the dam operates today as both a water storage reservoir and a hydroelectric power generator.
Beyond the exhibits, the rooftop observation deck gives you a solid aerial view of the dam’s face and the canyon below. It’s a good orientation point before you walk the dam itself, since you can identify the key landmarks and figure out where you want to spend your time on the ground.
The Mike O’Callaghan-Pat Tillman Memorial Bridge
The Memorial Bridge spans the canyon directly downstream from the dam and offers the best elevated angle for viewing the dam’s face. A short walking path from the parking area leads to a dedicated pedestrian overlook on the bridge, and the walk itself takes about 10 to 15 minutes each way. Most visitors skip this and miss the best wide-angle perspective the site offers.
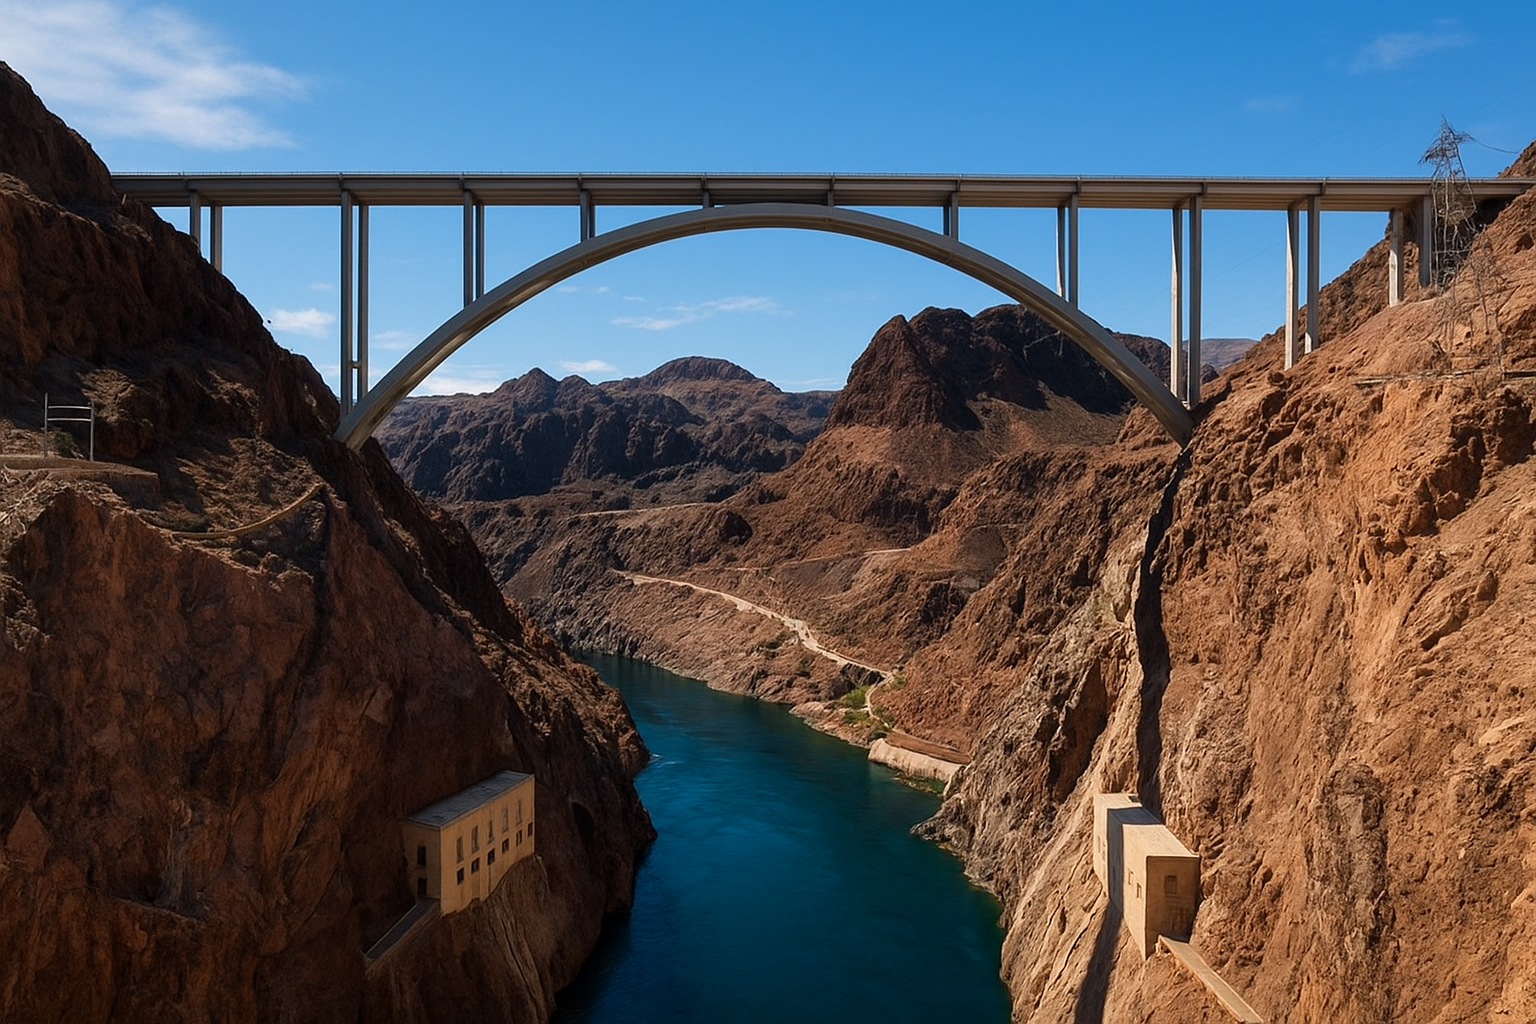
Photographers specifically benefit from reaching the bridge early in the morning, when the light falls on the front of the dam rather than behind it. Mid-afternoon light flattens the texture of the dam’s face and makes photos look dull, so timing matters here.
Weather and seasonal conditions
Summer temperatures between June and September regularly push past 105°F, and the exposed concrete and metal surfaces amplify the heat. If you’re visiting in summer, plan your arrival before 10 AM, carry at least one liter of water per person, and wear a hat and sunscreen. Shade is limited across most viewing areas.
Spring (March through May) and fall (October through November) offer the most comfortable conditions, with temperatures typically ranging between 65°F and 85°F. Winter visits from December through February are absolutely viable since the site stays open year-round, crowds thin considerably, and ticket lines move fast. The trade-off is shorter daylight hours, which matters if strong natural light for photography is a priority for you.
Step 1. Choose your tour and buy tickets
Hoover Dam offers three distinct ticket tiers, and picking the wrong one before you arrive is the most common mistake first-time visitors make. Each tier unlocks a different part of the site, and the prices jump noticeably as you move up. Knowing what each level includes means you won’t be stuck buying a second ticket at the window or realizing mid-visit that you missed the part you actually came to see.
The three ticket tiers explained
The Visitor Center admission (approximately $10 per adult) covers the two-floor exhibit space, multimedia presentations, and the rooftop observation deck. It does not include any guided tour component, and it works well if your schedule is tight or you simply want the overview experience without committing extra time.
Moving up one level, the Powerplant Tour (approximately $15 per adult) adds a guided walk down to the generation floor, where you see the turbines up close and get a concrete sense of how the dam produces electricity. Most visitors find this tier the most satisfying because it goes past the surface without a significant time commitment.
For the most comprehensive experience, the Hoover Dam Tour (approximately $30 per adult) includes everything in the Powerplant Tour plus access to the original Nevada-side tunnels bored directly through the dam’s structure. Groups are kept small, and this tour sells out weeks in advance during spring and fall peak months.
| Ticket Type | Approx. Price (Adult) | What’s Included |
|---|---|---|
| Visitor Center | $10 | Exhibits + observation deck |
| Powerplant Tour | $15 | Above + generator floor tour |
| Hoover Dam Tour | $30 | Above + Nevada tunnel access |
How to buy tickets in advance
If you want the Hoover Dam Tour during any weekend from March through May or September through November, booking two to three weeks ahead is the minimum, not a suggestion.
Tickets are available directly through the Bureau of Reclamation’s official site. You select your date, choose your tier, and pay upfront. Download your confirmation or print it before leaving Las Vegas, since the entrance booth scans your barcode on arrival and does not accept screenshots that require a data connection to load.
As this hoover dam visitor guide notes throughout, a guided tour departing from Las Vegas handles ticketing, transportation, and timing as part of the package, which removes the need to manage any of this on your own.
Step 2. Get there from Las Vegas
The drive from the Las Vegas Strip to Hoover Dam covers approximately 30 miles and takes between 40 and 50 minutes under normal traffic conditions. Most of that time is straightforward highway driving, but a few route decisions and timing choices make a noticeable difference in how smooth the trip goes.
Driving directions from the Strip
From the Strip, head south on Las Vegas Boulevard or take I-515 East toward Henderson, then merge onto US-93 South toward Boulder City. Follow US-93 through Boulder City and continue roughly seven miles past the city center until you see the signed turnoff for the dam parking facility. The road drops into the canyon and delivers you directly to the entrance. Total driving time from most Strip hotels is 40 to 50 minutes, though it stretches longer on weekend mornings when Boulder City sees heavier through-traffic.
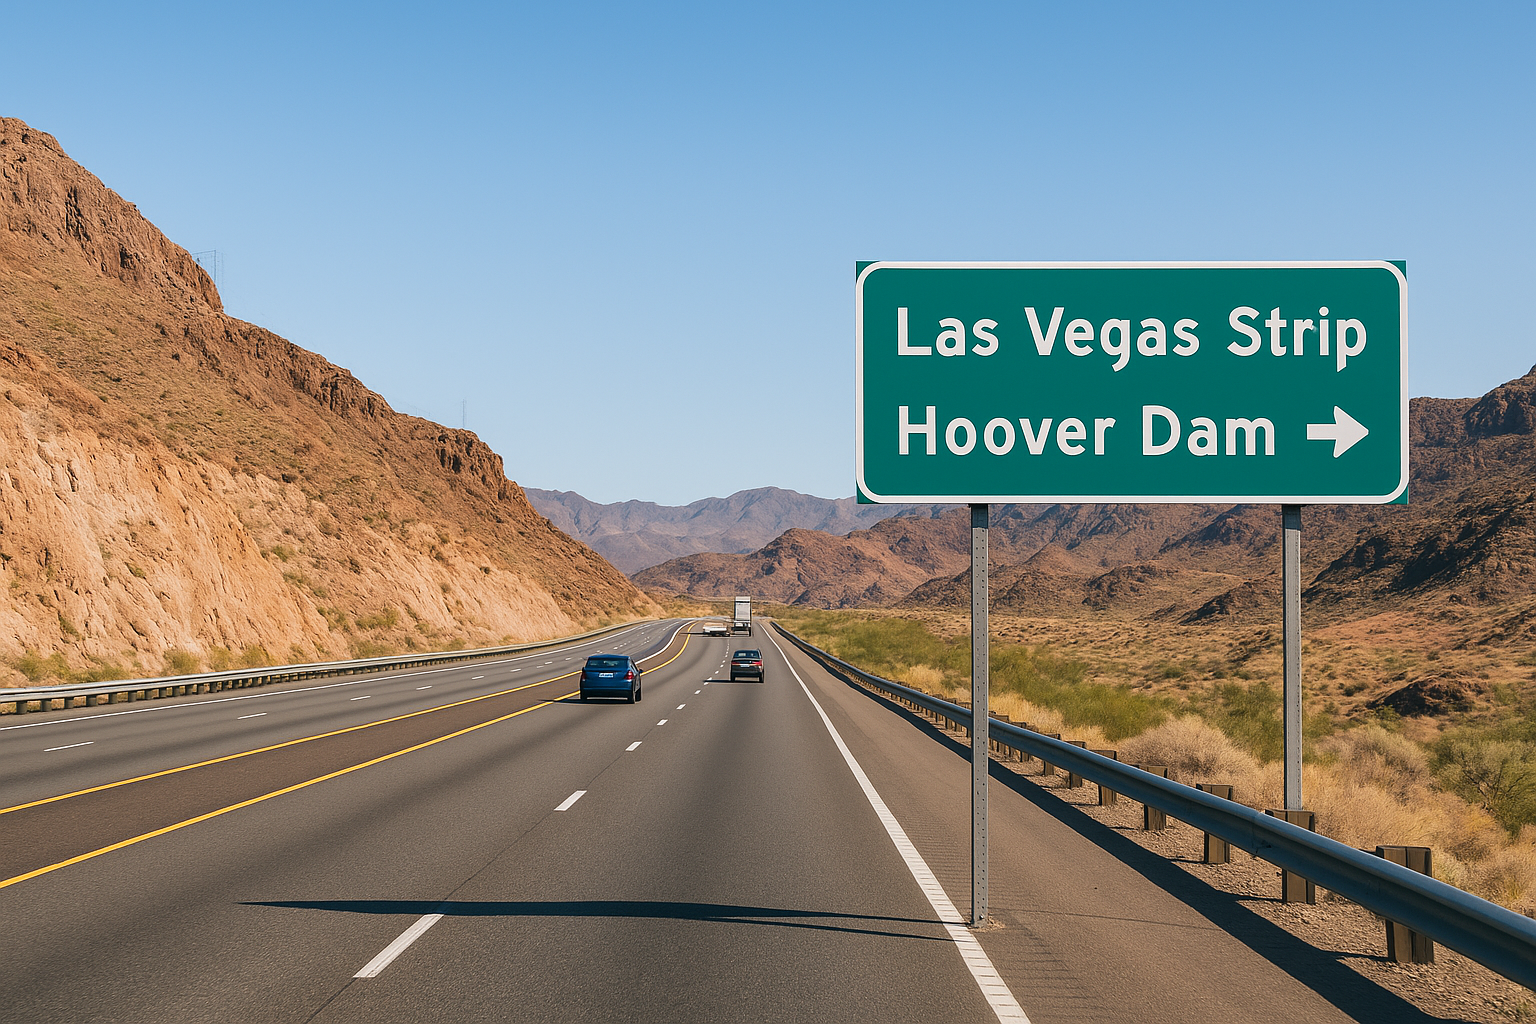
Avoid leaving the Strip between 7:30 AM and 9:00 AM on weekdays if you want to clear Henderson commuter traffic before hitting US-93.
Here is a quick reference for the drive:
| Detail | Info |
|---|---|
| Starting point | Las Vegas Strip |
| Route | Las Vegas Blvd or I-515 East, then US-93 South |
| Pass through | Henderson, then Boulder City |
| End point | Hoover Dam parking garage (signed off US-93) |
| Total distance | ~30 miles |
| Estimated drive time | 40-50 minutes without delays |
Alternative ways to get there
Renting a car or booking a guided tour departing from Las Vegas are the two realistic choices for most people making this trip. Rideshare services like Uber and Lyft can technically complete the drive, but the round-trip cost adds up fast, and pickup availability in the canyon location is unreliable once you’re ready to leave.
If you don’t have a personal vehicle, public transportation does not reach the dam directly, so planning your transportation before you arrive in Las Vegas is essential. A guided tour bundles all transportation logistics into one booking, which means you avoid navigating unfamiliar roads, managing parking, and coordinating your return timing on your own. For anyone using this hoover dam visitor guide to plan a longer day that includes multiple stops near the dam, a guided tour also makes it far easier to reach the Memorial Bridge overlook and return to the Strip without rushing.
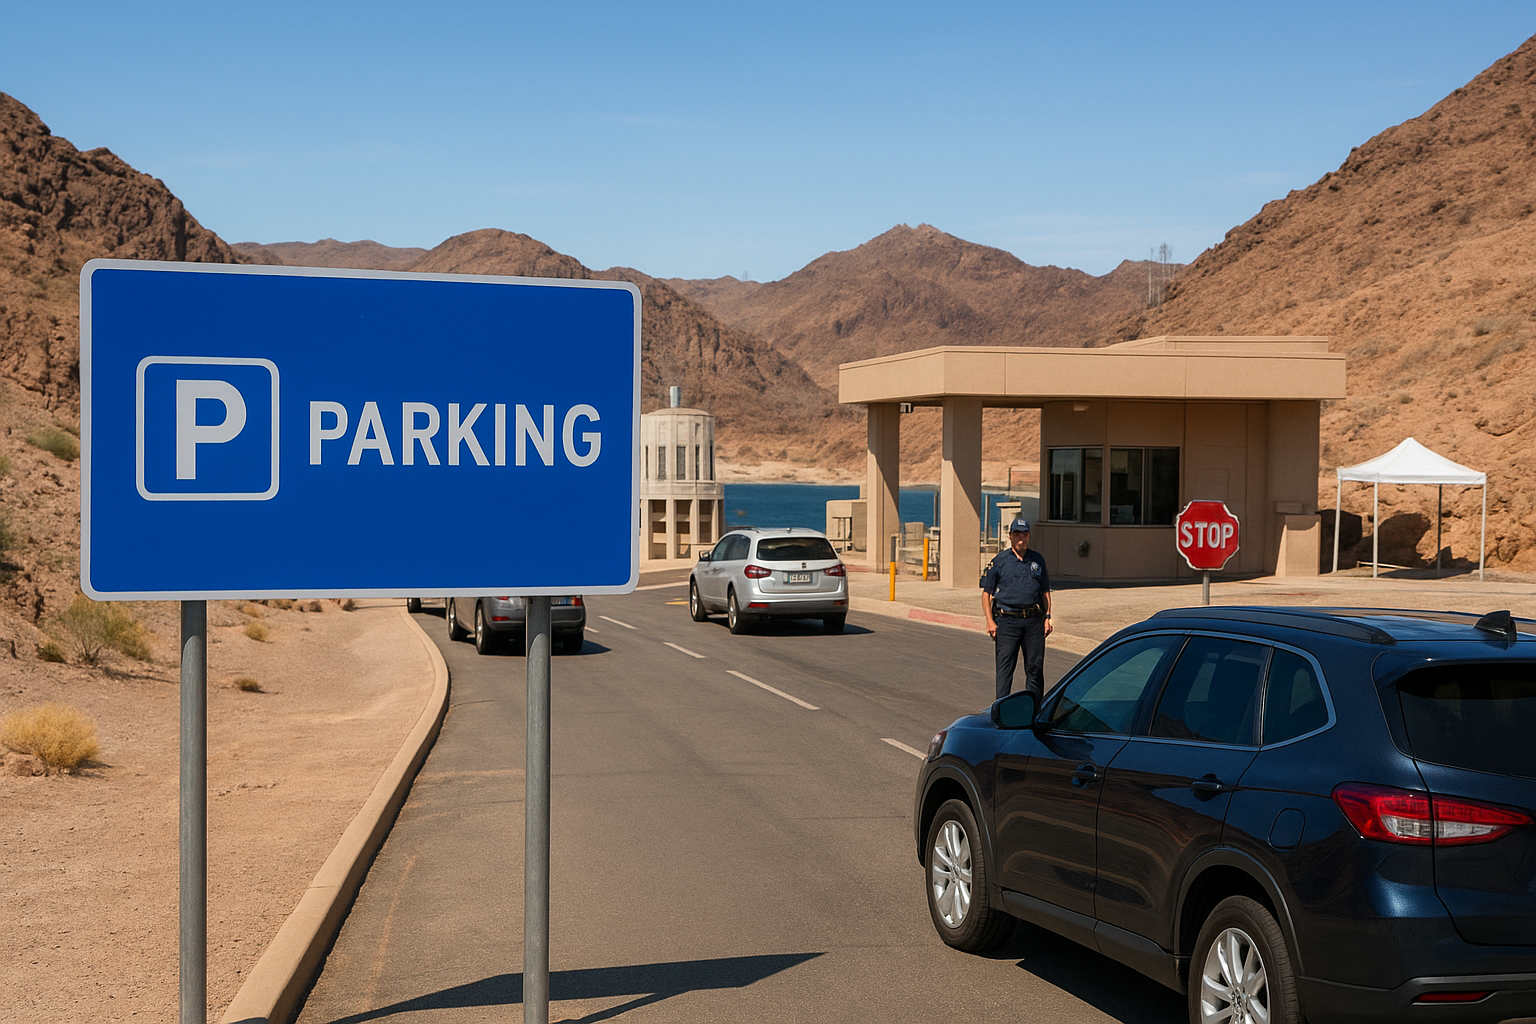
Step 3. Park and clear security smoothly
Parking and security at Hoover Dam are straightforward once you know the layout, but they catch a lot of visitors off guard on busy days. The site has two separate parking areas, and the security checkpoint applies to everyone entering the dam structure. Spending five minutes reading this section of the hoover dam visitor guide before you leave Las Vegas will save you at least 20 minutes of confusion once you arrive.
Parking options at the dam
The main parking garage sits on the Nevada side of the dam and is the first facility you reach when driving in from US-93. It costs $10 per vehicle and holds several hundred cars, but it fills up fast on weekend mornings and holiday periods. If the garage shows full at the entry booth, attendants direct overflow vehicles to a secondary surface lot further up the road, which adds a short walk to your visit.
Pull into the garage before 9:30 AM on any weekend between March and November, and you will almost always find a spot on the lower levels without waiting.
Here is a quick comparison of your two parking choices:
| Parking Area | Cost | Distance to Visitor Center | Notes |
|---|---|---|---|
| Main garage (Nevada side) | $10 | 2-5 minute walk | Fills early on weekends |
| Overflow surface lot | $10 | 10-15 minute walk | Used when garage is full |
What to expect at security
Security screening at Hoover Dam operates similarly to airport-style screening. Every visitor entering the dam structure passes through a checkpoint with metal detectors and bag screening. The process moves quickly when visitors arrive prepared, and the list of prohibited items is fairly short but worth knowing before you pack your bag for the day.
Leave these items in your vehicle or hotel room:
- Large backpacks over a certain size (check current limits at usbr.gov)
- Pepper spray or any aerosol beyond personal-size sunscreen
- Tripods with legs longer than six inches (compact travel tripods are generally fine)
- Weapons or sharp tools of any kind
Wearing slip-on shoes speeds up the process, and keeping your phone and keys in an outer pocket rather than buried in your bag lets you clear the conveyor belt faster. Guards are professional and efficient, so the checkpoint rarely backs up unless a large tour group arrives just ahead of you.
Step 4. Get the best views and photos
Hoover Dam offers several distinct vantage points, and each one captures a completely different scale and angle of the structure. Knowing which spots to prioritize before you arrive lets you move efficiently between them rather than wandering and backtracking. This section of the hoover dam visitor guide breaks down the three locations that deliver the strongest photos and views, along with specific advice on timing and camera settings.
The Memorial Bridge overlook
The Mike O’Callaghan-Pat Tillman Memorial Bridge gives you the single best wide-angle view of the dam’s face. Walk from the main parking garage toward the pedestrian path on the upstream side of the bridge, then cross to the dedicated observation area on the opposite end. The full walk takes 10 to 15 minutes each way, and most visitors skip it entirely, which means you will often have the overlook to yourself even on busy days.
The bridge overlook is the only spot where you can fit the entire dam face, the canyon walls, and Lake Mead’s waterline into a single photograph.
Arrive before 10 AM if you want front-lit conditions on the dam’s face. After late morning, the sun moves behind the dam from this angle and puts the structure in partial shadow, which flattens the detail in photos.
Dam-level angles and the spillway walkway
Walking across the top of the dam gives you a close-range perspective that the bridge overlook cannot match. The Nevada-side intake towers make strong foreground subjects when photographed from the roadway, and the downstream canyon view from the center of the dam looks directly toward the Memorial Bridge. Both angles reward a wide-angle lens or the widest setting on your phone camera.
The spillway walkway on the Arizona side extends slightly past the dam’s edge and gives you a downward angle toward the canyon floor that feels more dramatic than the standard roadway view. Few visitors notice the spillway path, so it stays uncrowded even when the dam top is busy.
Camera settings and timing tips
Use these settings as your starting reference point when shooting in direct sunlight at the dam:
| Condition | Shutter Speed | Aperture | ISO |
|---|---|---|---|
| Bright morning light | 1/500s | f/8 | 100 |
| Overcast sky | 1/200s | f/5.6 | 200 |
| Interior Visitor Center | 1/60s | f/2.8 | 800 |
Phone camera users should switch to the standard lens rather than the ultra-wide for dam-level shots, since the ultra-wide distorts the curved intake towers at close range. For the bridge overlook, the ultra-wide setting gives you the field of view you need to frame the full structure without stepping back into traffic.
Step 5. Plan a half-day or full-day itinerary
How much time you have determines everything about how you structure your visit. A half-day trip from Las Vegas gives you enough time to see the Visitor Center, walk the dam top, and reach the Memorial Bridge overlook before driving back. A full-day trip opens up additional stops at Lake Mead, Boulder City, and the canyon interior. Use this section of the hoover dam visitor guide to build a realistic schedule before you leave the Strip.
The half-day itinerary (3 to 4 hours on-site)
A half-day visit works well if you’re combining the dam with another Las Vegas activity the same day. Arrive by 9:00 AM to beat the parking rush and secure a spot on a lower garage level. Move through security quickly by following the tips in Step 3, then head directly to the Visitor Center ticket counter before the first tour groups arrive.
Completing the Powerplant Tour before 11:00 AM keeps you ahead of the midday rush and gives you the generation floor nearly to yourself.
Follow this sequence to make the most of a half-day visit:
| Time | Activity |
|---|---|
| 9:00 AM | Arrive, park, clear security |
| 9:15 AM | Purchase tickets at Visitor Center counter |
| 9:30 AM | Explore Visitor Center exhibits (two floors) |
| 10:15 AM | Join Powerplant Tour |
| 11:00 AM | Walk dam top, photograph intake towers |
| 11:30 AM | Walk to Memorial Bridge overlook |
| 12:15 PM | Return to parking garage and depart |
The full-day itinerary (6 to 8 hours total)
A full-day schedule gives you time to book the Hoover Dam Tour with Nevada tunnel access, explore the canyon at a relaxed pace, and add a stop in Boulder City on the drive back. Boulder City is a small historic town about seven miles north of the dam and home to several local restaurants where you can get a sit-down meal rather than snacking from a vending machine.
Add these stops to the half-day sequence above to stretch the visit into a full day:
- 12:30 PM: Pack a lunch and eat at the picnic area near the Nevada-side overlook
- 1:15 PM: Book the Hoover Dam Tour (Nevada tunnel access) if you purchased it in advance
- 2:30 PM: Drive back through Boulder City and stop for a late lunch or coffee
- 3:30 PM: Explore the Boulder City/Hoover Dam Museum on Nevada Way (low-cost admission, excellent historical context)
- 4:30 PM: Begin the return drive to Las Vegas, arriving on the Strip before 6:00 PM
Wrap-up and next steps
This hoover dam visitor guide has walked you through every decision point in sequence: picking the right ticket tier, driving from the Strip without getting stuck in Henderson traffic, clearing security fast, finding the photo angles most visitors miss, and building a realistic itinerary whether you have three hours or eight. The biggest takeaway is that a little preparation before you leave your hotel eliminates almost every frustration visitors run into at the site.
If you want to skip the logistics entirely, the most direct route is booking a guided experience that handles transportation, timing, and expert narration in one package. Our guides have been making this drive since 2007 and know the dam, the canyon, and the surrounding region in detail. Check out our Hoover Dam private tours to see current availability and reserve your spot before the date you want sells out.